Create your first resource-based product
Introduction to resource-based booking
Typically a product is represented by a physical item, e.g. a book, that is shipped to the customer. A resources-based product represents a resource such as e.g. a studio, house or meeting room that the customer may reserve for a period of time (ie. an hour/day/week). Thus behind a product there's one or more ressources that is reserved when the customer orders a product.
In the following we're creating a product where you can rent a meeting room. But we start by creating the necessary items for actually creating the product.
1. Create rental periods
The first step is to determine for how long you may rent the room at a time. Here we're specifying that you may rent the room one day at a time, where a day is 12 hours. A rental period like this is called a Timeslot Type, and you'll find these using the menu Settings -> Timeslot Types.
When selecting Settings -> Timeslot Types a window like shown here is displayed. Here you can create new or change existing timeslot types.
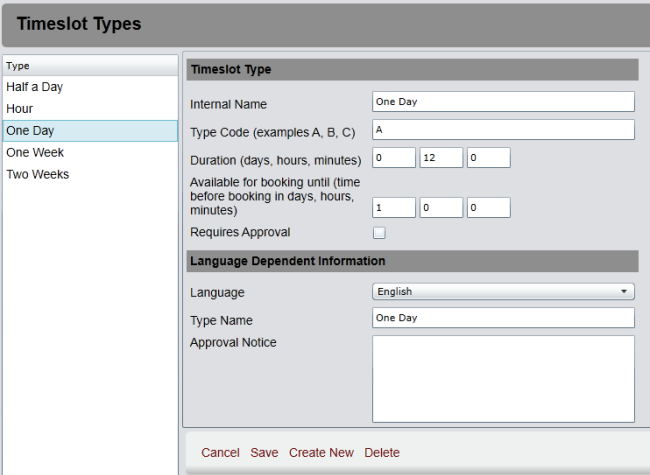
Here we have created a timeslot type for the 12 hours, and called it "One Day".
Read more about Timeslot Types here
2. Create timeslot patterns (Optional)
We've now defined the fixed rental period for the meeting room. Later we'll create a schedule for which days and start times you may rent the meeting room. When defining the product you'll choose a calendar type that defines how this schedule is made. By choosing the webshop calendar type "Week (manual scheduling)" you will have to manually define the available timeslots. In this case it may be useful to create a timeslot pattern for e.g. a week specifying at which days and hours the previously defined timeslot type can be booked. You can then use this pattern to apply available times for one week at a time when creating the schedule.
You can create a timeslot pattern from the menu Settings -> Timeslot Patterns. Below is shown a week-pattern we have created for the meeting room.
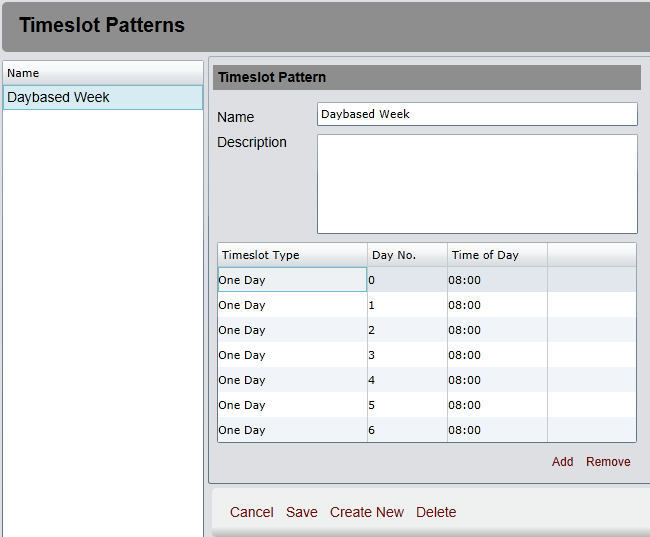
The pattern is given a name, and optionally provided with a description. Then a row is added for each available time by pressing the Add link below the table. Here we've created a week pattern for the "One Day" timeslot type, and thus there are 7 rows corresponding to 7 days, where Day No. and the time of day column specifies the time given the start day the pattern is applied to. If you apply the pattern with Monday as the start day, then the first row specifies a timeslot on Monday at 08:00, the next row is +1 day ie. Tuesday at 08:00 and so on.
Read more about Timeslot Patterns here
3. Create a resource
Behind all resource-based products there has to be one or more resources that are booked when the customer orders a product. In this example the meeting room has to be created.
You can create resources from the menu Resources -> Resources. Below the resource screen is shown.
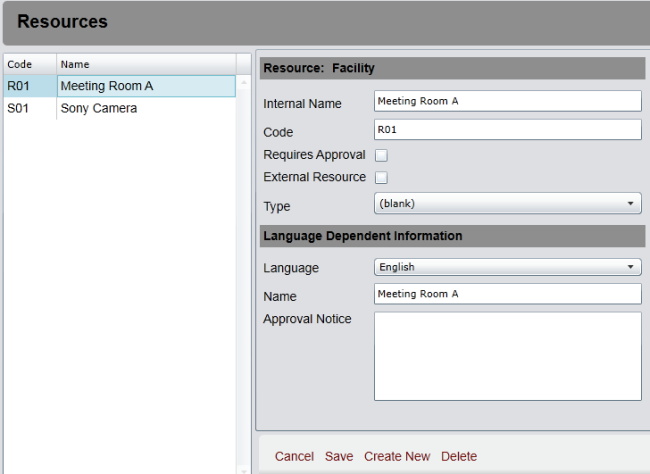
The left side shows the resources that has been created. In this case we have used the Create New link create a resource named "Meeting Room A" that we will use with the product. You must as a minimum specify an internal name and a code for the resource. You should also provide a public name below the "Language Dependent Information" section for each of the languages you wish to support. When creating a new resource you are presented with the following dialog as shown below.
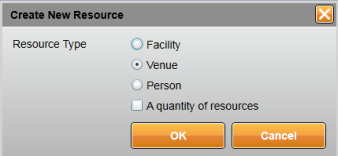
Here you can select which type of resource you wish to create. For the meeting room we select "Venue".
Read more about Resources here
4. Create prices
To make it possible for a customer to book the product we must create a pricing for the product. You can create prices using the menu item Finance -> Prices. The Prices screen is shown below.
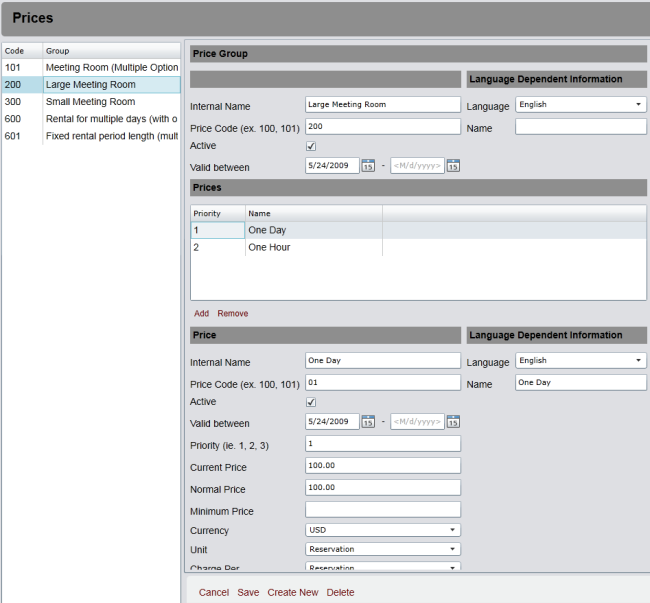
Here we have created a price "Large Meeting Room" for the room. Actually we have created a price-group, that has a price called "One Day" (look below the header "Prices" for the selected price name). The price for one day is 100 USD, and the price is selected by a price selection rule that says "Timeslot type code is equal to " = A (refer to the previous step where we created the timeslot type and assigned "A" as its code). You can create more than one price each with a selection rule - in this example we have also created a price for one hour.
5. Transfer pictures of the product

The image shown above must be transferred in order to show it along it the product description in the webshop. This can be done from the menu item Settings -> Documents/Images. The screen depicted below is shown when selecting this menu item..
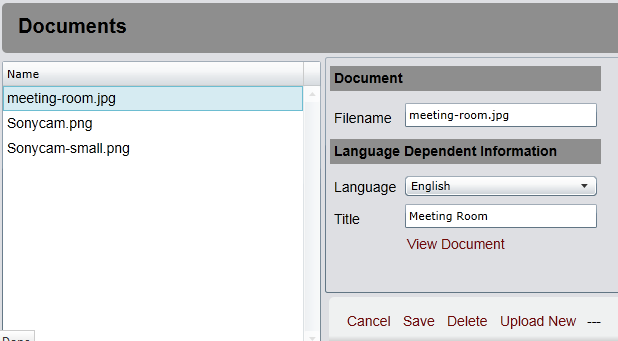
To transfer the image click Upload New and select the picture file. After the image is transferred you may choose to give it a title. The title will be shown along with the image when showing the product details in the webshop. Here we have transferred an image "meeting-room.jpg" and given it the title "Meeting Room".
Read more about Documents/Images
6. Create the product
Now we have the prerequisites in place in order to create a product. This is done from the menu item Resources -> Products.
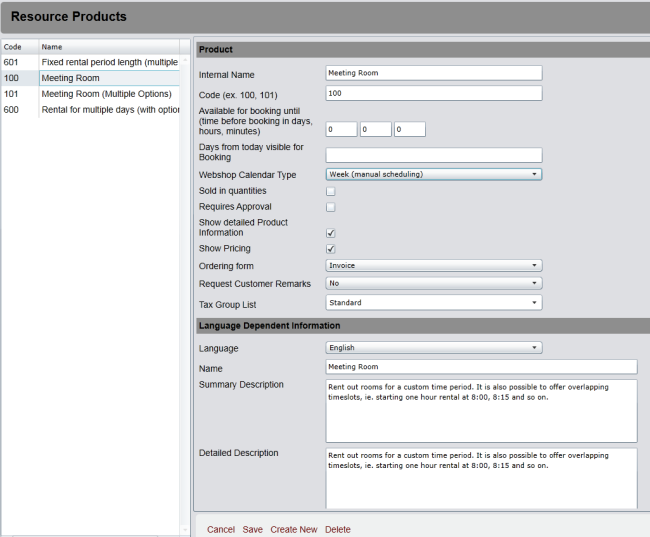
Press Create New to create a product for the meeting room, and fillout the fields. At internal name we have specified "Meeting Room". The internal name is only showed in the administrative user interface. In the Code field a unique code is specified for the product - it may appear in e.g. reports. In "Available for booking until" you may enter a booking deadline relative to the start time of the reservation. In this case we have not specified a time, so you can e.g. book a time at 8:00 - 9:00 at 07:59. In "Days from today visible for Booking" you can specify for how long time from today the Customer may see available times. When selecting a Calendar Type you have the following options available.
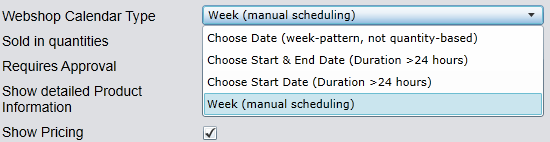
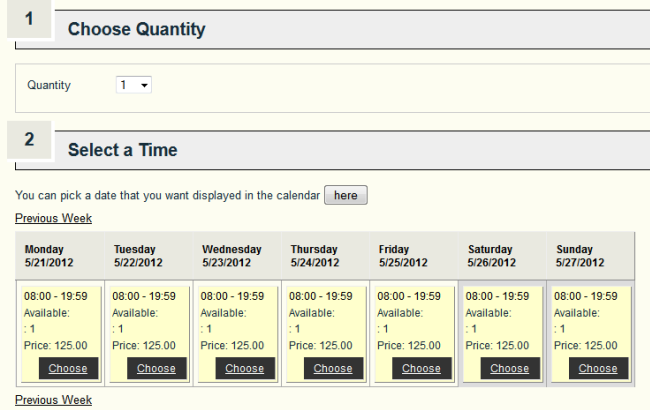
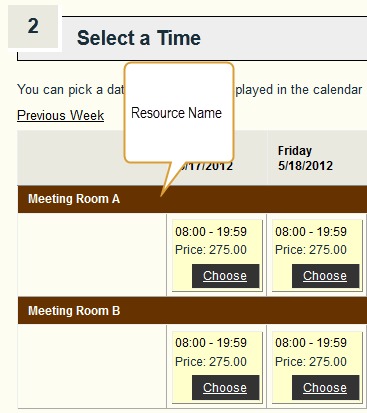
Here we have selected "Week (manual scheduling)" which means (1) we must create all times offered for the customer to book in a calendar, and (2) that the customer selects a time in a calendar that looks as shown below.
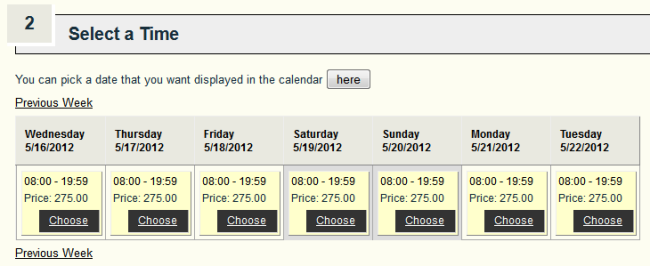
This calendar type can be used as long as the reservation period is below 24 hours. If you pick "Choose Date (week-pattern, not quantity-based)" then you are instead using a weekly pattern that is repeated week by week, and the customer select a time in a calendar as shown here.
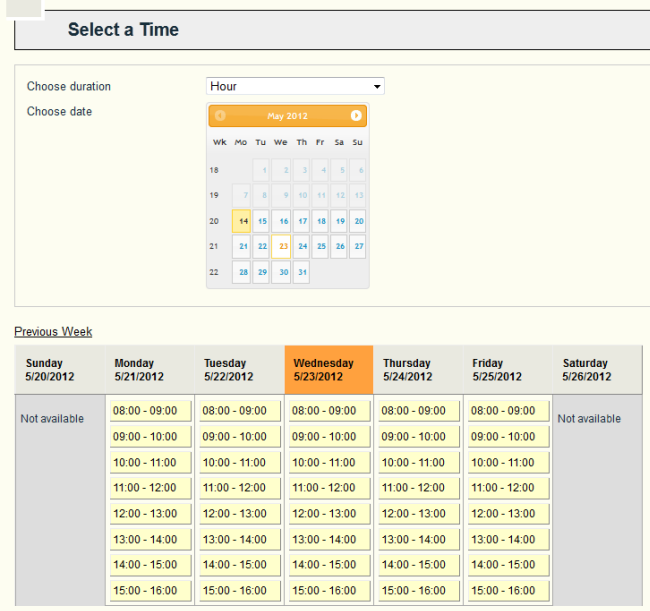
This calendar type can be used as long as the reservation period is below 24 hours. You also have the option to create overlapping times - which cannot be done using manual scheduling. Please note that with this calendar type the customer can only reserve one item, ie. it is not possible to specify a quantity.
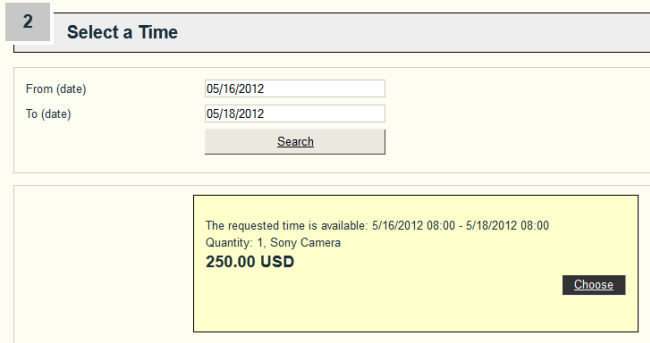
The calendar type "Choose Start Date (Duration > 24 hours)" can be used for reservations that lasting from one day to several days/weeks. The customer sees the calendar as shown here.
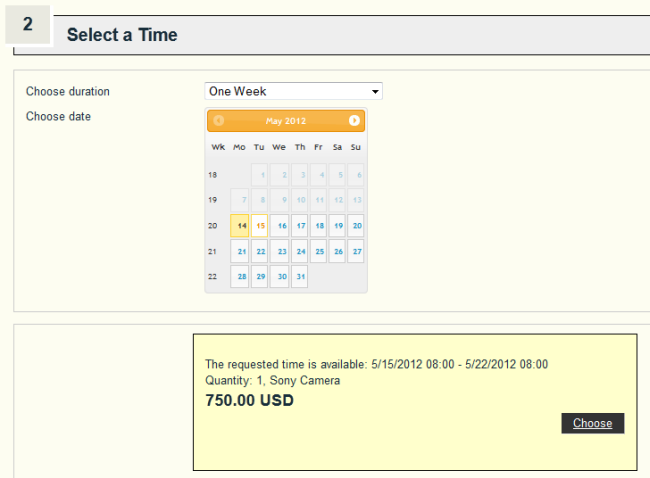
The calendar type "Choose Start & End Date (Duration > 24 hours)" can be used for reservations that lasting from one day to several days/weeks. The customer sees the calendar as shown here.
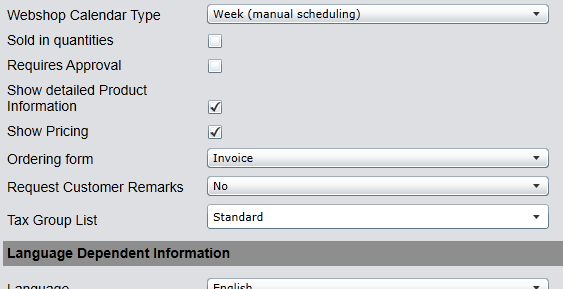
If you check "Sold in quantities" the customer can specify a quantity he/she wishes to order. This will look like shown below in the webshop.
If you check "Requires Approval" then you will have to approve the customer's order manually (cannot be used with online payment). Check "Show detailed Product Information" in order to have a separate page for the product that can be accessed from the product list (as shown below).

Check "Show Pricing" in order to show prices along with the product description. If you're using the system for making appointments then you may leave "Show Pricing" unchecked. In "Ordering Form" you may select between
- Invoice
- Invoice Later
If you have chosen not to show prices then you must select "Invoice Later". In "Request Customer Remark" you may choose to ask the customer for a remark for each booked item, e.g. if you're offering boat trips then this field can be used to supply the name of the passenger. You can select between the following values,
- No, Yes (Optional), Yes (Required)
In "Tax Group List" you can select a tax group for the product.
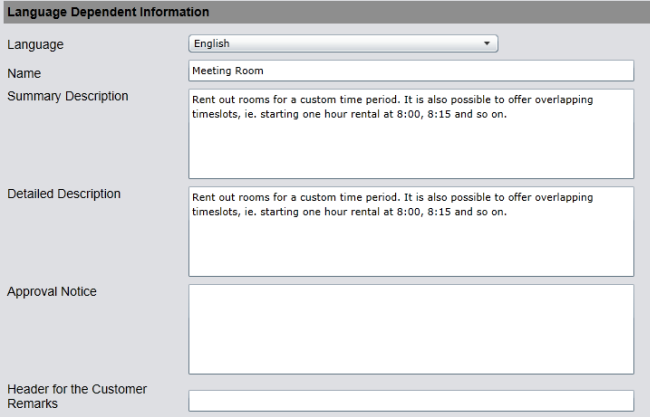
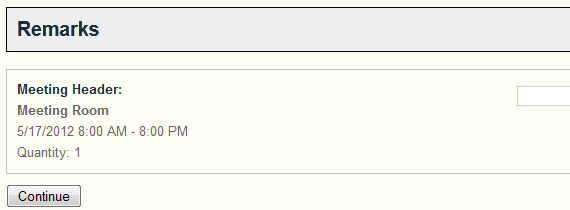
Below Language Dependent Information you should provide a name, short description (shown in the product list), detailed description (shown in the product page), and optionally an approval notice for the product. You should supply this information for each of the languages you support (by changing the value in the Language field). You can also supply a header used when asking for customer remarks. For a meeting room it could be a meeting header as shown below.
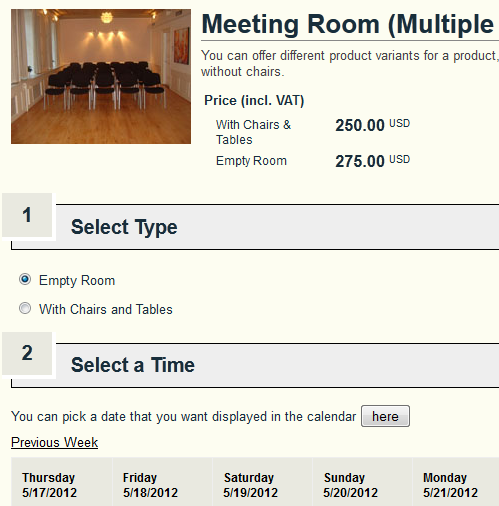
We are not creating product variants in this example, but you may choose to if you e.g. want to offer two setups for a meeting room (as shown below)
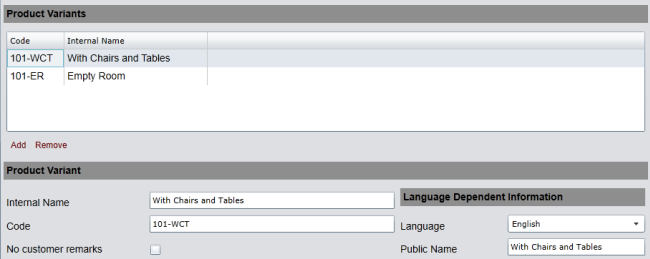
In the webshop product variants are shown like below.
If you have checked "Sold in quantities" then it is possible to specify a quantity for each product variant. If you have chosen to ask for customer remarks, then you may disable this for some of the product variants (e.g. consider a boat trip where you ask for passenger names, but also offers to transport trailers, bicycles etc.).
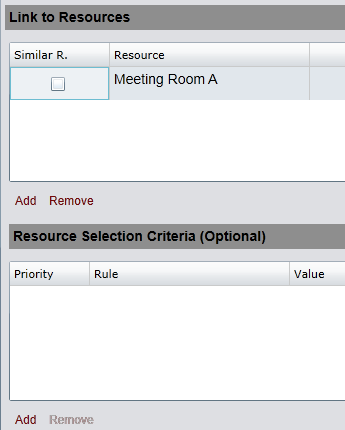
Here you can add the resource you have created for the product by pressing the topmost Add link. If you add more resources when having selected the calendar type "Week (manual scheduling)" and aren't allowing quantity based bookings then each resource will be shown in the webshop as displayed here.
It is possible to specify a selection criteria for each resource that may depend on the product variant or timeslot type.
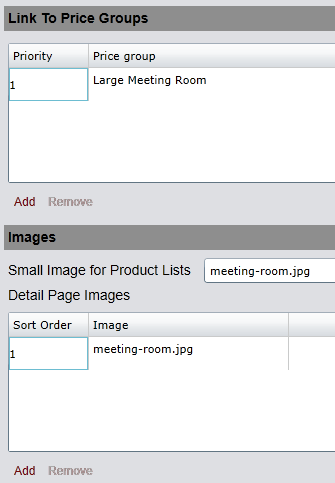
At "Link to Price Groups" we can add the previously created price group by pressing the topmost Add link, and selecting the meeting room price group. At "Images" you may select the image that is shown in the product list as well as add images to the product's own page.
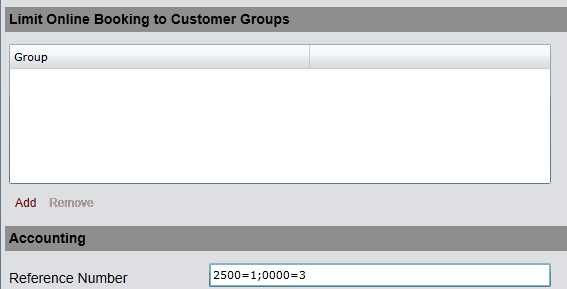
It is possible to restrict access to who can order a product. If you create a customer group, and assigns it to one or more customers. Then add this group to "Limit Online Booking to Customer Groups", and only these customer will be allowed to order the product. To see the product the customer will have to log in first.
If you have selected the e-conomic module then you must add a reference to the product group number the product belongs to in e-conomic. This is done in the form Tax percentage = Product Group No. In the example above for 25% and 0%.
7. Add the product to a product category
To show the product in the webshop you must add the product to a product category. This is done from the menu item Settings -> Product Categories.
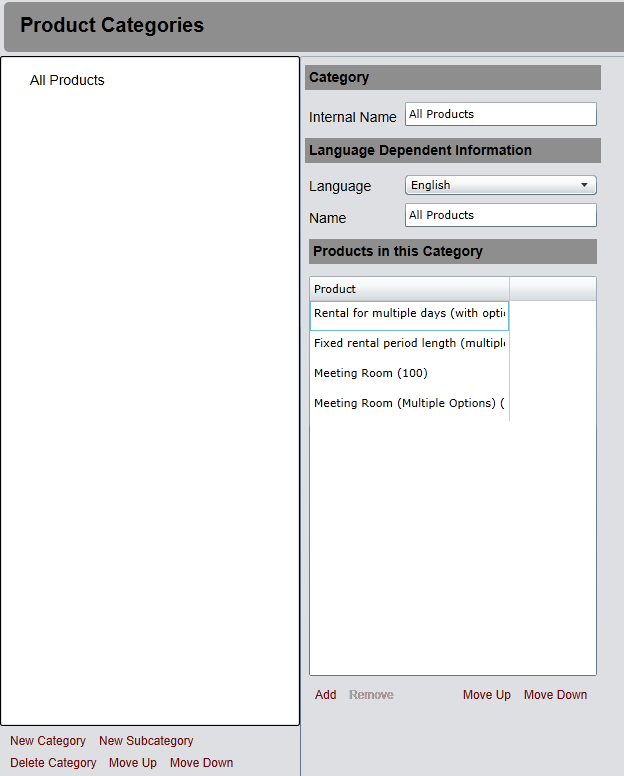
You select a category on the left side, and press the Add link below the "Products in this Category". Then you can select the product from a list.
Read more about Product Categories
8. Next step
We have now shown the process of creating your first product, but we have yet to offer times that the customer can book. See how you do this here