Booking Chart
Introduction to the booking chart
You can find the booking chart (calendar) in the menu Booking -> Chart. Here you can view, create and change bookings in a resource calendar.
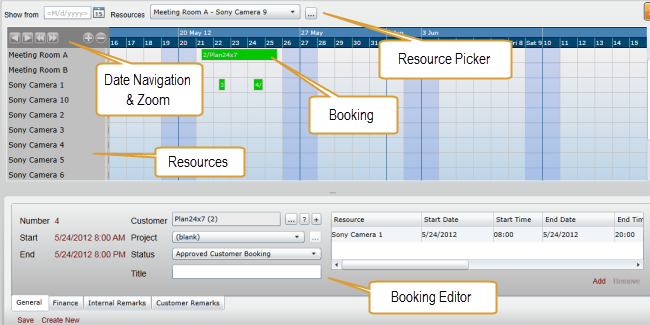
The top of the screen shows a calendar where you can see the bookings for the resources. The bottom of the screen is the booking editor that can be used to create or change bookings.
The calendar: Navigation & zooming
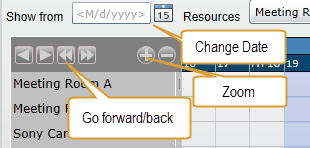
The calendar shows one line per resource along with the bookings present for the displayed period of time. If you wish to see bookings for another period then you can change the start date using
- The date picker (see "Change Date" on the image above)
- Go forward/back buttons (see "Go forward/back" on the image above). Buttons with a single arrow takes you a minor step back/forward in time, while double arrows takes you one calendar period back/forward.
Use the zoom buttons to change how many days/hours the calendar shows. Zoom in using the "+" button and out using the "-" button.
The calendar is different from a normal calendar. It starts on the left side from the start date and goes horizontally towards the end time on the far right. The calendar has time dividers to help determining the precise time of e.g. a booking.
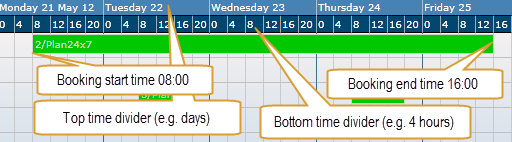
There are two levels of time dividers. The top divider is a coarse divider, here days, and the bottom is the finer one, here 4 hours. Using these you can see that booking no. 2 starts on monday 5/21 08:00 and ends on friday 5/25 16:00.
The booking editor
To view a booking in the editor select it in the calendar by clicking on it with the mouse.
The editor is divided into four tabs (look at the bottom) "General", "Finance", "Internal Remarks" and "Customer Remarks".
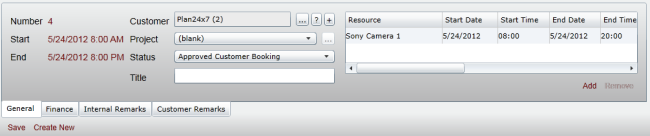
Tab: General
Here you can view general booking information ie. when the booking starts, its status, and which resources that are booked. In the following the fields are described.
Number
Booking number. Each booking is assigned a sequential number. You can also see this number on the booking in the calendar above.
Start
Start time for the first resource booking. A booking may contain multiple resources with different start times.
End
End time for the last resource usage.
Customer
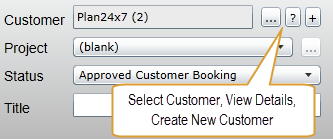
The customer that the booking relates to. Using the "..." button you can select the customer. Using the "?" button you can see customer details. Using the "+" button you can create a new customer entry.
Project
You may optionally attach the booking to a project here.
Status
The booking status is assigned here. You can choose between the following values
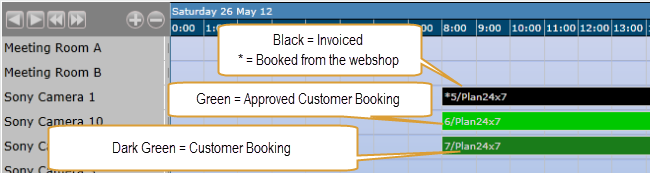
- Approved Customer Booking - This is the typical status for bookings.
- Booked by Customer - when a customer orders using your webshop the booking will have this status until it is approved (either automatically or manually)
- Cancelled - Used to cancel a booking (a booking cannot be deleted - only cancelled). Please note that when you assign the cancelled status you can no longer view the booking in the calendar.
Before a booking has been invoiced it will have a background color according to its status. When the booking has been invoiced it will appear with a black background. If the booking origins from the webshop then a star will appear before the booking no.
Title
Here you may provide a title for the booking, e.g. for a meeting room it could be what the meeting is about.
Resource usage
At the right side of the booking editor the resources allocated for the booking is shown in a table like below here.

The first field is the resource followed by the reservation period, status for the individual resource and a remark field. Using the Add/Delete links below the table you can add/remove resources from the booking.
If you wish to partially cancel a booking then you can assign the cancelled status on the individual resource line (this only makes sense when there are multiple resources on a booking).
Tab: Finance

On the finance tab you can view the financial details for the booking. If the booking has been invoiced then you can click to see the invoice associated.
Order no.
Here you can view the order number if the booking was booked from the webshop. Press the "..." button to show the order.
Order status
The order status is shown here.
Invoice no.
Here you can view the invoice associated with the booking (if any). Press the "..." button to show the invoice.
Invoice status
The invoice status is shown here.
No charge
Check "No Charge" if the booking should not be charged.
Prices

On the right side there is a table with the price details for the booking. If you create the booking yourself then you can add price information to the booking. When you at some point in time generate an invoice from a list of bookings then this price information is transferred to the invoice. Using the Add/Remove link you can add/remove price lines.
Create a booking
You can either create a booking from stratch using the booking editor (press the Create New link) - or use a faster approach - by selecting the resources in the calendar and click with the mouse on a date.
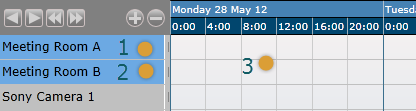
Select the resources as shown here (click the mouse as shown with a orange circle), click on the start time (does not have to be a precise click).
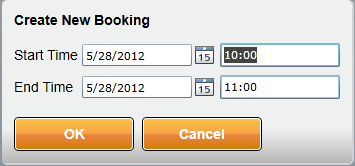
Then the dialog below is displayed where you can select the start- and end- time. Press the OK-button.
The booking editor now shows the following information:

where the resources meeting room A + B has been added. Then select a customer and booking status. To save the booking press the Save link.